Podman - Quadlets
Podman is the daemonless drop-in Docker replacement and has exceptional systemd support. With Quadlets, this support became even better and the hassle to work with systemd unit files is gone. It was never this easy to define your containers as systemd services.

Podman is the daemonless drop-in Docker replacement and has exceptional systemd support. With Quadlets, this support became even better and the hassle to work with systemd unit files is gone. It was never this easy to define your containers as systemd services.
Let's dig into Podman Quadlets.
Podman
Podman provides a real drop-in replacement for Docker. On top, it runs daemonless, supports rootless containers, has proper integration for systemd and adds features like auto-updates on top. With Cockpit, you will be granted with a nice frontend for Podman and your Linux system, too.
In the past, I have written lots of articles about Podman, please give them a shot, if you are new to Podman.
 Author
Systemd
Systemd is the system layer for Linux. Many people still think, that systemd was designed to be a mere init service, but this is way off the idea. Instead, systemd aims to be the layer between the kernel and the user. It offers opt-in services for name resolving, time syncing and service or log management.
Maybe... I should write some basic articles about systemd and its features?
Podman Quadlets
Podman always had impressive integration with systemd. In the past, I tackled the support to run systemd in Podman, but also how you can manage your containers with systemd. Quadlets makes the second part way easier and more maintainable.
Quadlets
When I heard about Quadlets, the first time, I was a bit puzzled. Until today, we were able to generate systemd service files via the podman generate systemd command. This was already pretty astonishing. Managing dependencies, networks, volumes and more was somewhat problematic and required manual work, though.
Podman offers a way to create complete container setups, including dependencies, in a simple, yet powerful way. We just need to create some files - Podman and systemd will take care of the creation of service files for our setup.
Want to see how it works? Let's go.
Simple example
For the sake of this tutorial, I want to use a simple example. What about… hmmm WordPress? Yep, let's use WordPress and MySQL for now. This should be simple enough to follow, but complex enough to demonstrate the power of Quadlets.
Architecture
WordPress demands a database, which can be used to connect to. This database must be running before WordPress is started. It might also be a good idea to put everything in a dedicated Podman Network. Well, the diagram will look like this.
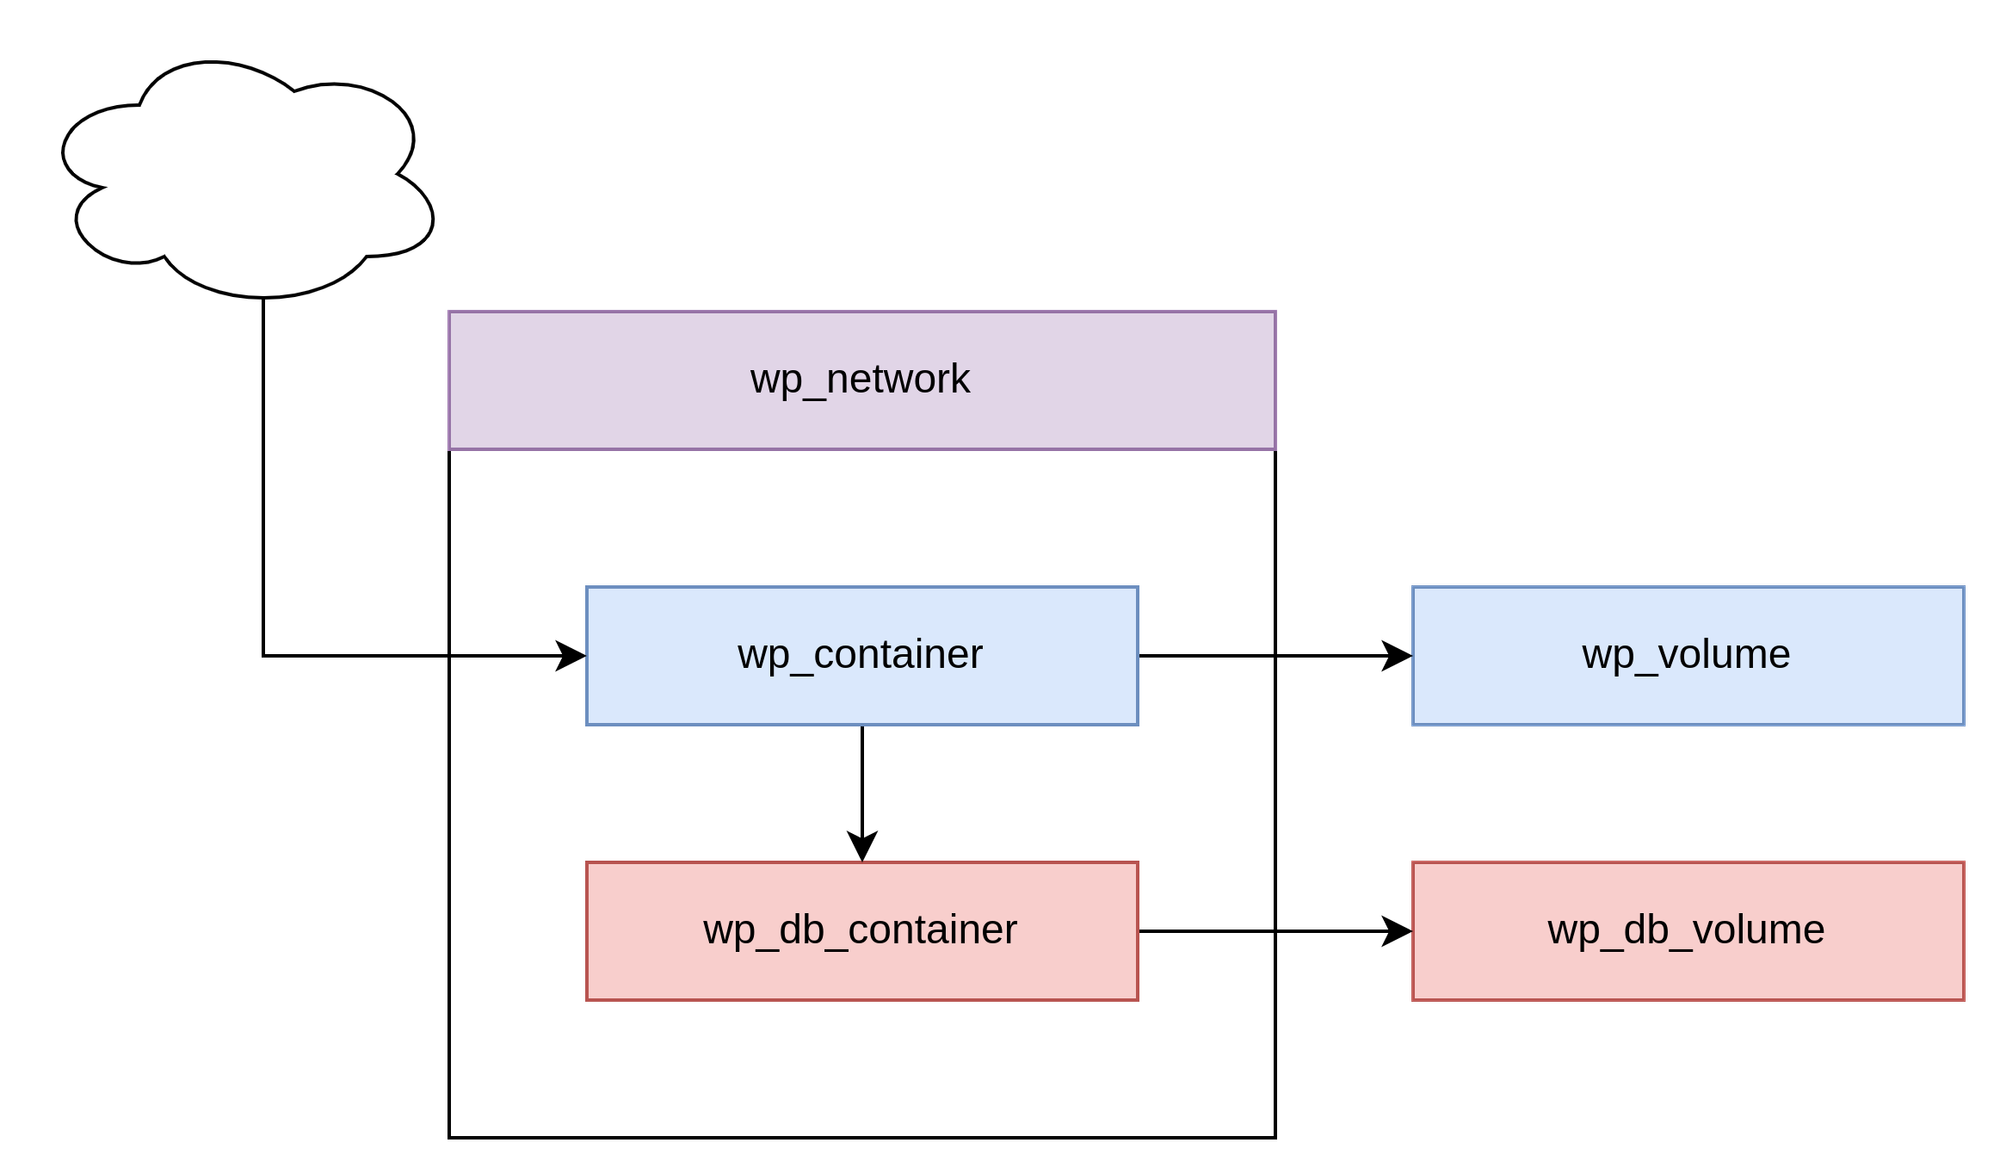
So, what do we need? Let's summarize this quickly.
- a WordPress network that holds the containers
- a WordPress database container
- a WordPress container
- a volume per container
Therefore, we will need 5 Quadlets in total.
Writing Quadlets
Now that we know what is needed, let's write it down. For now, I will stick to rootful containers, but you can achieve a similar result with rootless setups.
Let's start with the Network and Volumes. They don't require any special dependencies and only contain a couple of lines. Just place the below files in /etc/containers/systemd/.
[Unit]
Description=WordPress Container Network

[Network]
Label=app=wordpress
/etc/containers/systemd/wordpress.network
[Unit]
Description=WordPress Container Volume

[Volume]
Label=app=wordpress
/etc/containers/systemd/wordpress-app.volume
[Unit]
Description=WordPress Database Container Volume

[Volume]
Label=app=wordpress
/etc/containers/systemd/wordpress-db.volume
Now, we can also create a Quadlet for the WordPress database container. Here, we need to hand in some variables and additional configuration.
[Unit]
Description=WordPress Database Container

[Container]
Label=app=wordpress
ContainerName=wordpress-db
Image=docker.io/library/mariadb:10
Network=wordpress.network
Volume=wordpress-db.volume:/var/lib/mysql
Environment=MARIADB_RANDOM_ROOT_PASSWORD=1
Environment=MARIADB_USER=wordpress
Environment=MARIADB_DATABASE=wordpress
# This one should be stored in a secret
Environment=MARIADB_PASSWORD=password

[Install]
WantedBy=multi-user.target default.target
/etc/containers/systemd/wordpress-db.container
With the Network= and Volume= definition, we will create dependencies to the above Quadlets (or to the auto-generated services, to be precise). The
Finally, we can create a Quadlet for WordPress itself. Again, we need to provide some variables. In addition, we should make the wordpress_db container a dependency. This can be done by the Requires= and After= definitions. This works, since Podman hands over all common systemd unit definitions to systemd.
[Unit]
Description=Wordpress App Container
Requires=wordpress-db.service
After=wordpress-db.service

[Container]
Label=app=wordpress
ContainerName=wordpress-app
Image=docker.io/library/wordpress:6
Network=wordpress.network
Volume=wordpress-app.volume:/var/www/html
Environment=WORDPRESS_DB_HOST=wordpress-db
Environment=WORDPRESS_DB_USER=wordpress
Environment=WORDPRESS_DB_NAME=wordpress
# This one should be stored in a secret
Environment=WORDPRESS_DB_PASSWORD=password
PublishPort=8080:80

[Install]
WantedBy=multi-user.target default.target
/etc/containers/systemd/wordpress-app.container
That should do the trick. Now, we need to make systemd aware of the new files and generate the services. This can be done with a single command:
$ systemctl daemon-reloadThe generated services will not be parsed at some place, but you can discover each of them by running the fitting systemd commands.
$ systemctl status wordpress-app.service
$ systemctl status wordpress-app-volume.service
$ systemctl status wordpress-db.service
$ systemctl status wordpress-db-volume.service
$ systemctl status wordpress-network.service
You can also review the generated service.
$ systemctl cat wordpress-app.service
# /run/systemd/generator/wordpress-app.service
# Automatically generated by /usr/lib/systemd/system-generators/podman-system-generator
#
[Unit]
Description=Wordpress App Container
Requires=wordpress-db.service
After=wordpress-db.service
SourcePath=/etc/containers/systemd/wordpress-app.container
RequiresMountsFor=%t/containers
Requires=wordpress-network.service
After=wordpress-network.service
Requires=wordpress-app-volume.service
After=wordpress-app-volume.service

[X-Container]
Label=app=wordpress
ContainerName=wordpress-app
Image=docker.io/library/wordpress:6
Network=wordpress.network
Volume=wordpress-app.volume:/var/www/html
Environment=WORDPRESS_DB_HOST=wordpress-db
Environment=WORDPRESS_DB_USER=wordpress
Environment=WORDPRESS_DB_NAME=wordpress
# This one should be stored in a secret
Environment=WORDPRESS_DB_PASSWORD=password
PublishPort=8080:80

[Install]
WantedBy=multi-user.target default.target

[Service]
Environment=PODMAN_SYSTEMD_UNIT=%n
KillMode=mixed
ExecStop=/usr/bin/podman rm -f -i --cidfile=%t/%N.cid
ExecStopPost=-/usr/bin/podman rm -f -i --cidfile=%t/%N.cid
Delegate=yes
Type=notify
NotifyAccess=all
SyslogIdentifier=%N
ExecStart=/usr/bin/podman run --name=wordpress-app --cidfile=%t/%N.cid --replace --rm --cgroups=split --network=systemd-word
Since we have maintained everything to depend on each other, we can start only the WordPress container and everything else should come up automagically.
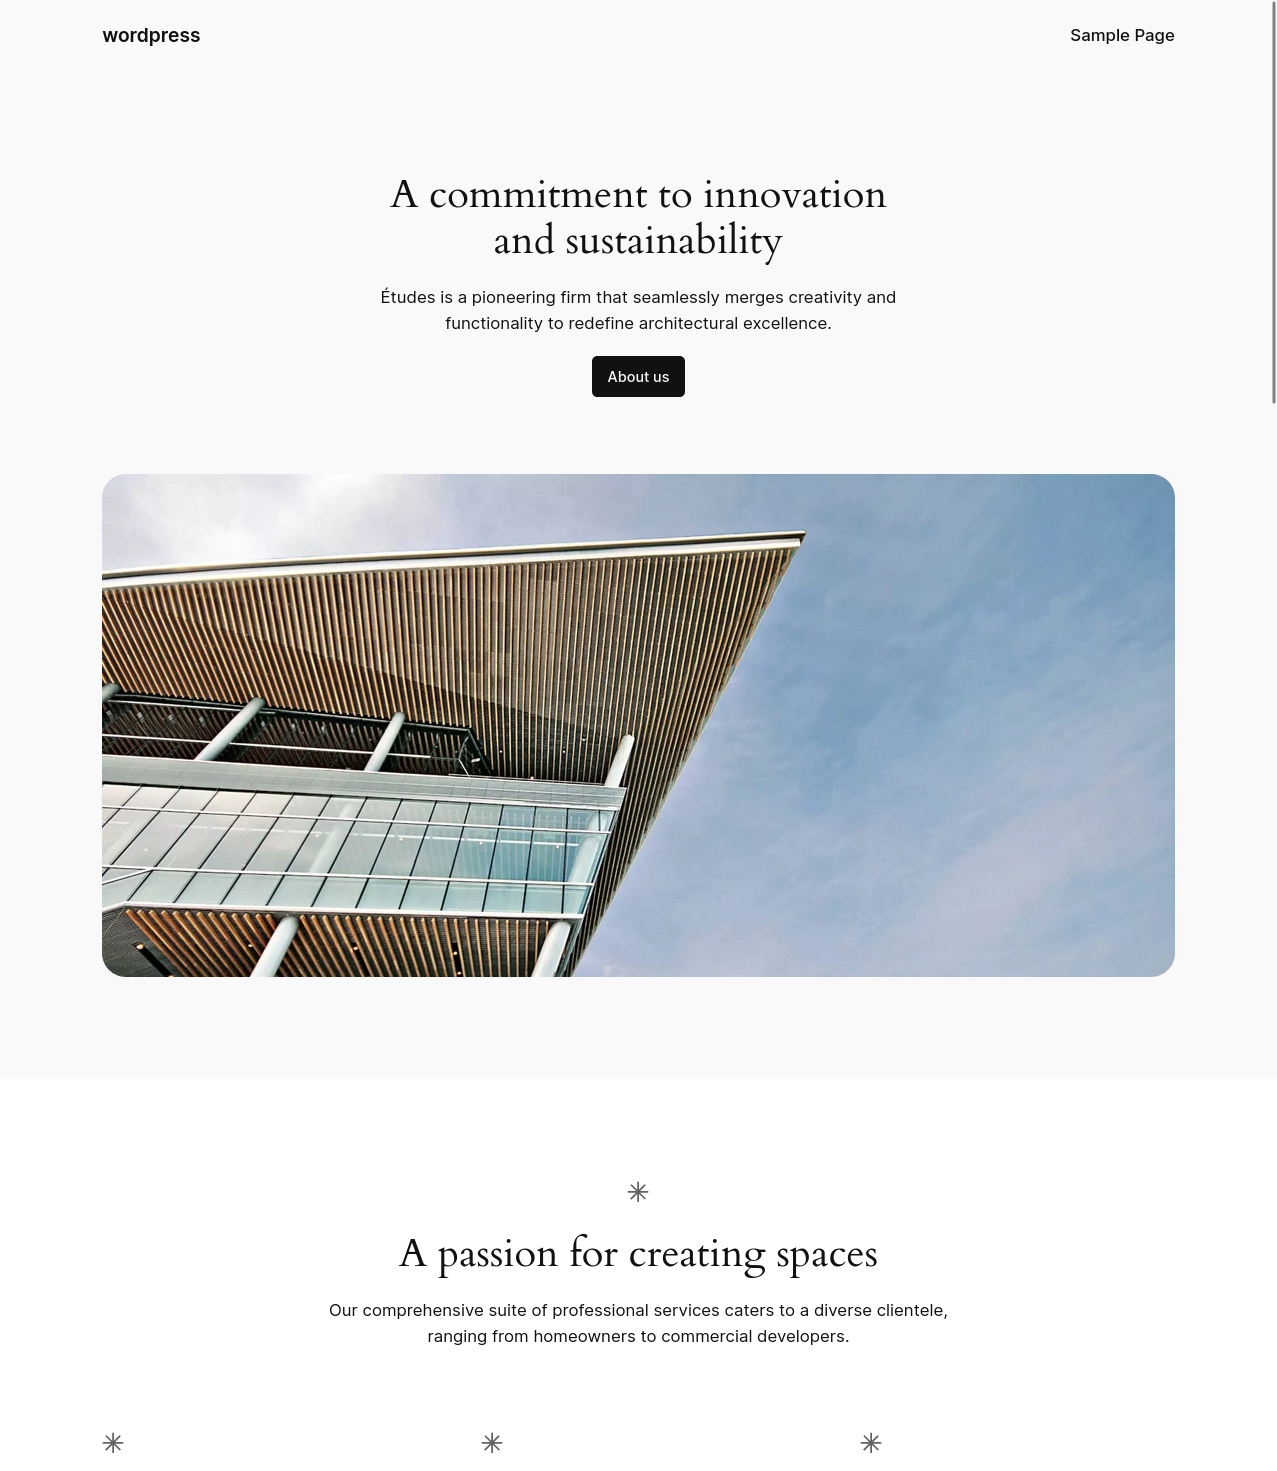
# Start the new service
$ systemctl start wordpress-app.service
Afterward, you can point your browser to IP_ADDRESS:8080 and should be greeted with the WordPress installer. The resulting page should look something like the below.
https://fosstodon.org/@mskoett/111730748271967122
Old part:
In case you want to have it auto-starting on each boot, you need to enable the service, too.
# Enable the new service
$ systemctl enable wordpress-app.service
Updated part:
If a service will be started at boot time, is defined in the service itself. The [Install] section defines when and how a service will be started. Therefore, you don't need to enable a service. If you don't want to have container started at boot time, you need to skip the [Install] section in the Quadlet file.
[Install]
WantedBy=multi-user.target default.target
Example install section
Be aware, even if you skip this part, the service will be started, if requested via Requires and After from another service. This behavior is documented here.
Production Readiness
Be aware, this setup is not production ready, by any means. For productive use cases you might extend this by running everything as a user (rootless), add backups, cron jobs, proper secrets and whatnot. For demonstration purposes how Quadlets work, it should be sufficient.
Docs & Links
In case you want to learn more about Quadlets, how to handle Secrets, play Kubernetes Manifests and alike, I recommend giving the following links a click.

Conclusion
The Podman Quadlet feature hugely simplifies how we can handle systemd units for Podman containers, and even more. After just some brief testing, I am convinced, that I will work with this way more in the future.
But, I am also interested in your impressions. What do you think about Quadlet? Is it even capable to replace Docker Compose files in the future? Does it make sense for home servers and edge or also for company deployments, for you? Please let me know.