Kubernetes - Getting Started (2/2)
In the last article, we were starting with Kubernetes and talked about the basic concepts, namespaces and pods. For this article, we will have a look at deployments, ingress and service objects.

In the last article, we were starting with Kubernetes and talked about the basic concepts, namespaces and pods. For this article, we will have a look at deployments, ingress and service objects.
Without further ado, let's get started.
The project
As a quick reminder, we decided to deploy the web application DailyNotes, which can be used to take notes, provides a calendar, and organize tasks.
To deploy the application, we need to ensure a couple of things.
- The app must run
- The app must be accessible
And this is exactly what we will do now.
Deploying the web app
Last time, we created a namespace and had a quick look at pods. As already stated, the smallest workload object in Kubernetes is the pod, but it is very unlikely, that we will use pods directly.
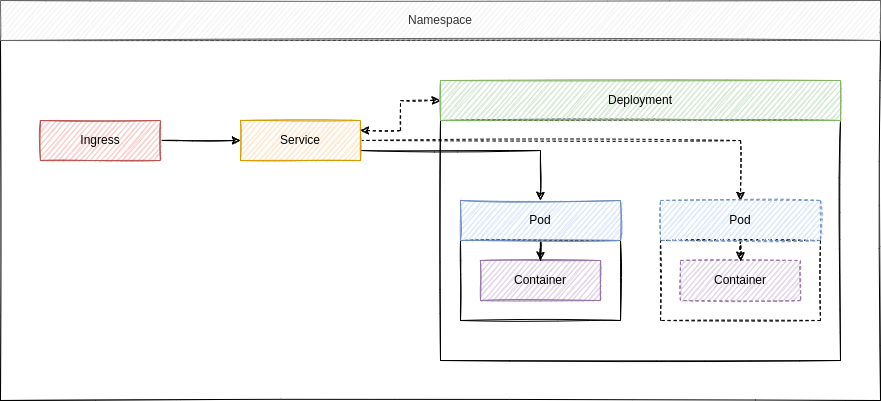
Diagram
Quick reminder, this is a schema of our deployment.
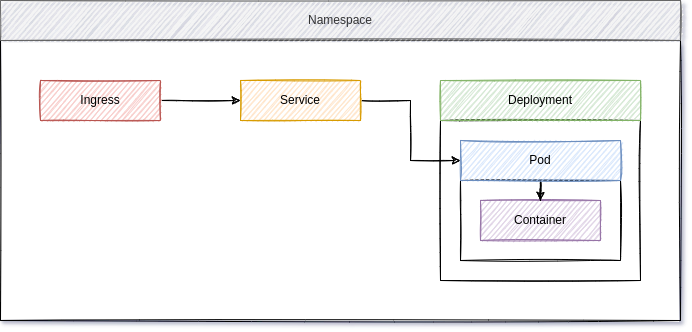
Deployment
A deployment describes where and how an application should be deployed. A deployment will take care, that each of the pods in it are running (if possible) and can be scaled properly. If you remember the pod from last time, we are basically making a template of this pod now and provide additional information.
The deployment.yml file may look a bit complicated first, but I will explain it in a moment.
---
apiVersion: "apps/v1"
kind: "Deployment"
metadata:
  name: "dailynotes-deployment"
  namespace: "dailynotes"
spec:
  selector:
    matchLabels:
      component: "web"
  replicas: 1
  template:
    metadata:
      labels:
        component: "web"
    spec:
      containers:
        - name: "web"
          image: "docker.io/m0ngr31/dailynotes:v1.0-beta18"
          ports:
            - containerPort: 5000
...This looks like a ton of unpredictable stuff, that one will never write without some guidance. Or is there some logic? Let's see and investigate each section.
The first 2 lines are saying to Kubernetes, what should be deployed. This is basically the same as for our namespace or pod definition.
---
apiVersion: "apps/v1"
kind: "Deployment"
...snip...The next 3 lines are telling Kubernetes how the deployment should be named and that it should be located in our namespace from the previous article.
...snip...
metadata:
  name: "dailynotes-deployment"
  namespace: "dailynotes"
...snip...The 7th line spec: is opening a new block, that will tell Kubernetes how the deployment is defined and which specifications must apply. With the selector: statement, we are telling Kubernetes: "every pod and container meeting this specification is part of the deployment". In our case, we are saying, that it should match the label "component=web". So every workload item, that has the label "component=web" is part of the deployment.
...snip...
spec:
  selector:
    matchLabels:
      component: "web"
...snip...The next line of the spec: block tells Kubernetes to deploy the workload (pod/container) once. If you adjust this to "2", Kubernetes will automatically spawn a second pod. For our use case, this is not very useful, but will help with scaling in many scenarios.
...snip...
  replicas: 1
...snip...The most interesting part is the template: block. This block tells Kubernetes what should be deployed and how it should look like.
...snip...
 template:
    metadata:
      labels:
        component: "web"
    spec:
      containers:
        - name: "web"
          image: "docker.io/m0ngr31/dailynotes:v1.0-beta18"
          ports:
            - containerPort: 5000
...The template has 2 major sections - the metadata: section and another spec: section. With the metadata section, we are telling Kubernetes to prepare each workload object with this metadata. Here, we will also add the label "component=web", to tell Kubernetes that the deployed workload is part of the deployment.
In the (second) spec: section, we are defining the specifications for our template workload. We need to define how the container should look like, and this is exactly the same as in the "pod.yml" from the previous article.
Phew... lots of theory. Let's see what happens, if we deploy the thing. Shall we?
# Check if the namespace is there
$ kubectl get namespace
NAME              STATUS   AGE
dailynotes        Active   57s
default           Active   105s
kube-node-lease   Active   106s
kube-public       Active   106s
kube-system       Active   106s

# Apply the deployment
$ kubectl apply -f deployment.yml
deployment.apps/dailynotes-deployment created

# Check if the deployment is running
$ kubectl get deployments -n dailynotes
NAME                    READY   UP-TO-DATE   AVAILABLE   AGE
dailynotes-deployment   1/1     1            1           56s

# Check if the workload is started
$ kubectl get pods -n dailynotes
NAME                                     READY   STATUS    RESTARTS   AGE
dailynotes-deployment-545985bbdc-z746k   1/1     Running   0          74s
So far, so nice. But... we cannot access the deployed containers, yet. There are different options to publish and expose a pod to the world. The most elegant way is a combination of service and ingress.
Service
If you have a single container, it is pretty easy to map a port, so it can be used from somewhere else. But, if you have a deployment, where you can have hundreds of pods that can listen to the same port this will be not be sufficient. Nobody wants to add each pod manually, so it can be used.
The Kubernetes service object is a concept to help with this. Instead of adding each pod to some ports, you will create a service, that is bound to a deployment and expose the desired port for you. This way, you can add more or less pods to a deployment.
So, every time you add more workload objects to your deployment, the service will know this and help with balancing the traffic. Furthermore, a service will be the "inbound" connection for port mappings and the ingress. Let's build one in a service.yml file.
---
apiVersion: "v1"
kind: "Service"
metadata:
  name: "dailynotes-service"
  namespace: "dailynotes"
spec:
  type: "ClusterIP"
  selector:
    component: "web"
  ports:
    - protocol: "TCP"
      port: 80
      targetPort: 5000
...As before, we need to specify the apiVersion:, the kind: and some metadata. The spec: block is the most interesting one, but also pretty simple.
With the type:, we can define how the service should behave. The default is "ClusterIP", which exposes the service on a cluster-internal IP. There are other types like "NodePort" or "LoadBalancer". You can read more about these in the documentation and maybe some future articles. For now, let's stick to the "ClusterIP".
For the "ClusterIP" type, you need to specify a port map so Kubernetes is aware how to process traffic.
- "protocol" is optional and describes the used network protocol
- "port" is the port where the traffic is exposed, so one can route traffic to the service
- "targetPort" is the port of your container/pod, as defined in your deployment or pod configuration
Let's apply our configuration.
# Apply the service.yml
$ kubectl apply -f service.yml
service/dailynotes-service created

# Check services
$ kubectl get service -n dailynotes
NAME                 TYPE        CLUSTER-IP      EXTERNAL-IP   PORT(S)   AGE
dailynotes-service   ClusterIP   10.100.54.225   <none>        80/TCP    14s
You can also test the service already. This works via a port forwarding from your local machine to the Kubernetes service. It's pretty easy.
# Connect to the service directly
$ kubectl port-forward service/dailynotes/service 8080:80 -n dailynotes
Forwarding from 127.0.0.1:8080 -> 5000
Forwarding from [::1]:8080 -> 5000
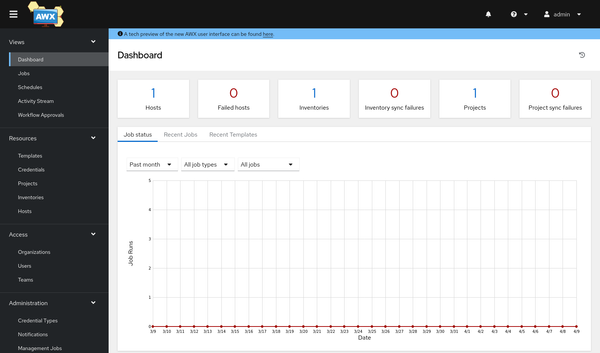
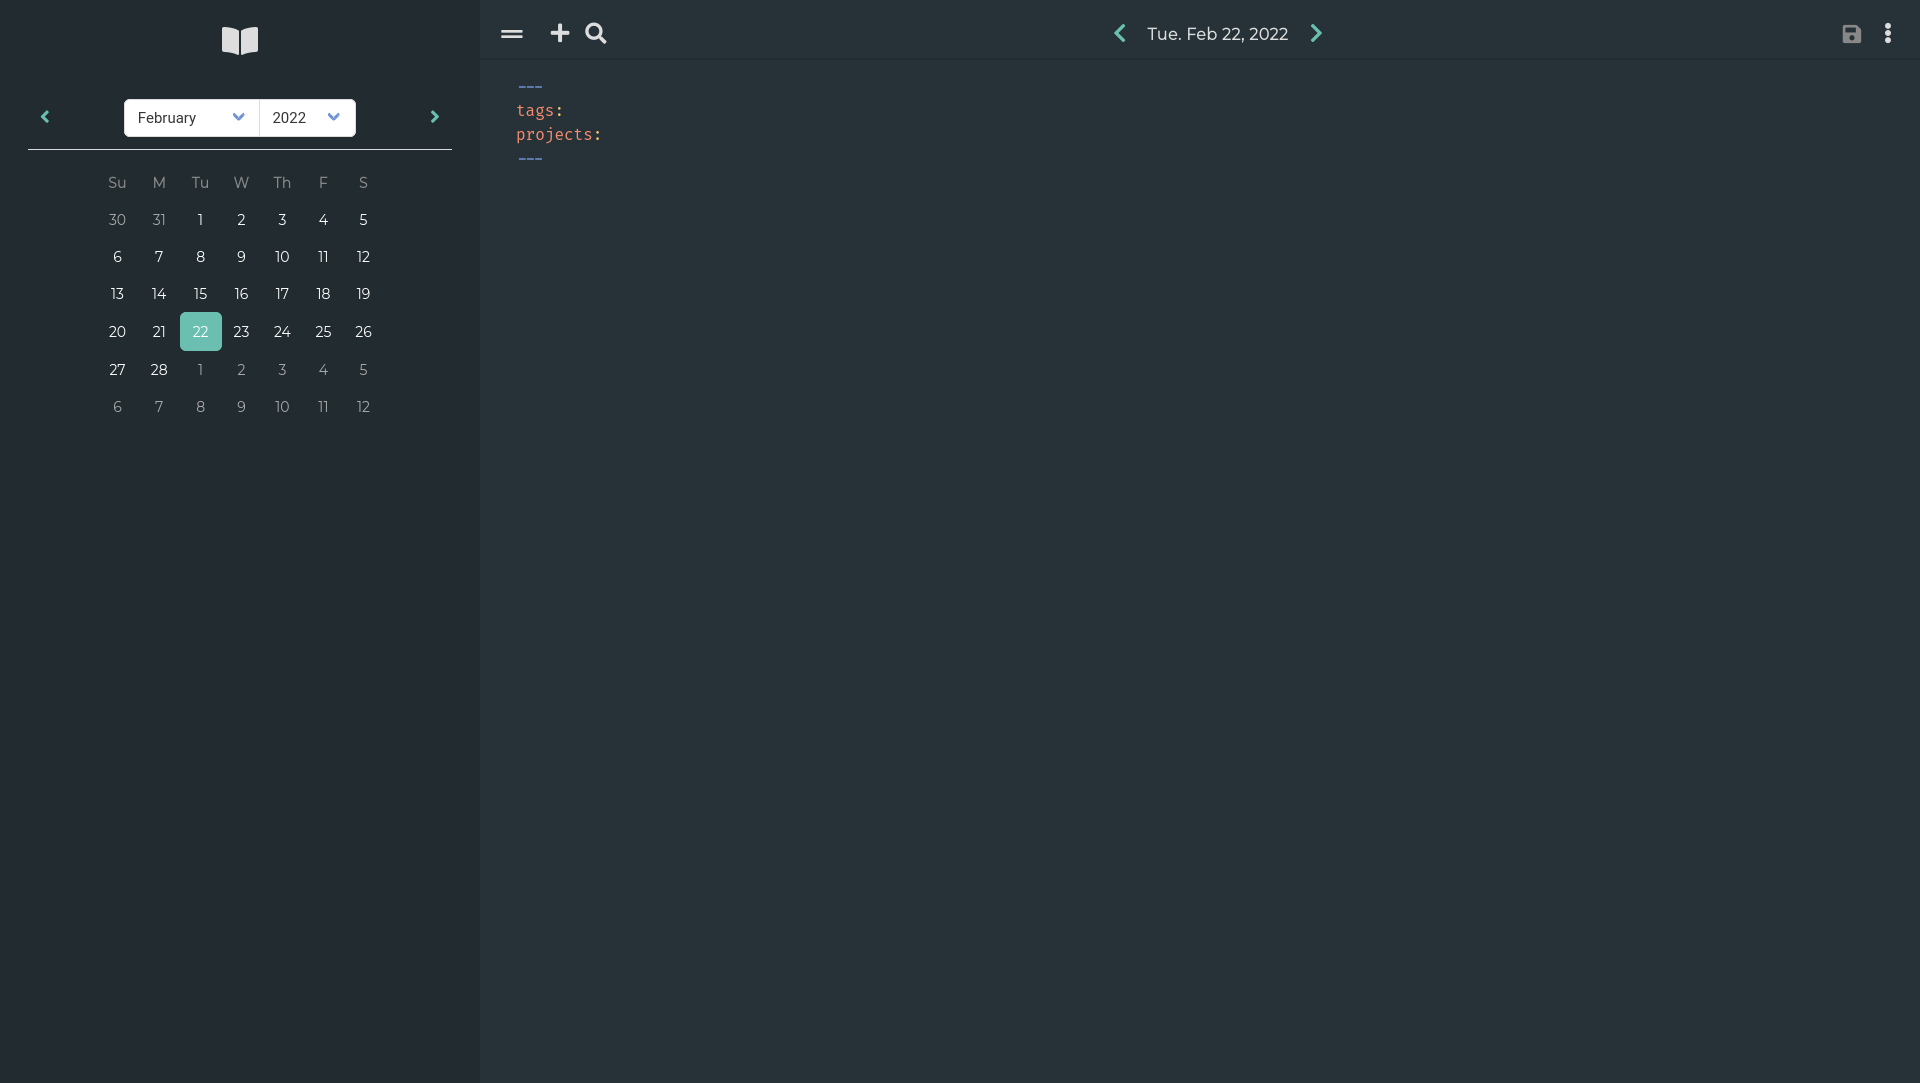
Now open your browser and point it to localhost:8080. You should see the below web page.

It's working. Whoop. You can also see some traffic notices in your terminal.
# Connect to the service directly
$ kubectl port-forward service/dailynotes-service 8080:80 -n dailynotes
Forwarding from 127.0.0.1:8080 -> 5000
Forwarding from [::1]:8080 -> 5000
Handling connection for 8080
Handling connection for 8080
Handling connection for 8080
Handling connection for 8080
Handling connection for 8080
Handling connection for 8080
Handling connection for 8080
But, that not what we want. We want to have it working directly from the outside and not run a command every time, we want to access the DailyNotes app.
Ingress
The Kubernetes Ingress object is what we need to allow access to a service object. Under the hood, you will have an Ingress Controller, which is basically a proxy/loadbalancer. The Ingress object configures the Ingress Controller.
You need to enable the Ingress Controller on Minikube, which is pretty easy.
# Enable the Ingress Addon
# This deploys an Ingress Controller in your Minikube Instance
$ minikube addons enable ingress
    ▪ Using image k8s.gcr.io/ingress-nginx/controller:v1.1.0
    ▪ Using image k8s.gcr.io/ingress-nginx/kube-webhook-certgen:v1.1.1
    ▪ Using image k8s.gcr.io/ingress-nginx/kube-webhook-certgen:v1.1.1
🔎  Verifying ingress addon...
🌟  The 'ingress' addon is enabled

# Check if it is enabled
$ minikube addons list
...snip...
| ingress                     | minikube | enabled ✅   | unknown (third-party)          |
...snip...
Afterwards, we will set up a simple Ingress Object for our DailyNotes deployment. Let's create an "ingress.yml" file.
---
apiVersion: "networking.k8s.io/v1"
kind: "Ingress"
metadata:
  name: "dailynotes-ingress"
  namespace: "dailynotes"
spec:
  rules:
    - host: "dailynotes.example.com"
      http:
        paths:
          - pathType: "Prefix"
            path: "/"
            backend:
              service:
                name: "dailynotes-service"
                port:
                  number: 80
...The above configuration is a very simple version of an Ingress object, and you can add way more to it. But it should be ok for the start.
As always, we will define what and where it should be deployed. In our case, we want a kind: "Ingress" Object in our "dailynotes" namespace: "dailynotes".
---
apiVersion: "networking.k8s.io/v1"
kind: "Ingress"
metadata:
  name: "dailynotes-ingress"
  namespace: "dailynotes"
...snip...
For the specifications, I have chosen to await requests to host: "dailynotes.example.com" and all traffic should be forwarded to our service object name: "dailynotes-service".
...snip...
spec:
  rules:
    - host: "dailynotes.example.com"
      http:
        paths:
          - pathType: "Prefix"
            path: "/"
            backend:
              service:
                name: "dailynotes-service"
                port:
                  number: 80
...
Let's apply the configuration as we did with the previous examples.
# Create Ingress
$ kubectl apply -f ingress.yml
ingress.networking.k8s.io/dailynotes-ingress created

# Check the Ingress
$ kubectl get ingress -n dailynotes
NAME                 CLASS   HOSTS                    ADDRESS     PORTS   AGE
dailynotes-ingress   nginx   dailynotes.example.com   localhost   80      40s
One more detail
But... since we are having Minikube on our local machine, we need to ensure that traffic that is directed to "dailynotes.example.com" is reaching our Minikube instance. In a production environment, you will set up a proper DNS record on your DNS server, and you will be good to go. On a local machine, you can edit your local hosts file to effectively do the same.
First, you need to know the IP of Minikube Ingress.
# Get the Minikube IP
$ minikube ip
192.168.49.2
Now you need to edit your local hosts file. Just open the file "/etc/hosts" with your editor and add a new line at the end.
...snip...

192.168.49.2 dailynotes.example.com
Now, you can point your browser to dailynotes.example.com and voilà.

Just hit the "Sign Up" link, and you can create an account for you on your own DailyNotes instance, running on your Minikube Kubernetes instance.
Storage and Volumes
There is more to it. In Docker or Podman, you will create volumes to store your data in a mounted directory. This can be done in Minikube, too. But, depending on the way you use Minikube, it is not very predictable where the data is stored. If you want to test Persistent Volumes on Minikube, I highly suggest reading the documentation about the situation on your own.

I will also ensure to address this topic in a later article.
Docs & Links
There are way more useful article and documentation, I found useful for myself.
Conclusion
I really hope that the descriptions explained the major objects of Kubernetes to you. There is so much more to learn, and I will have a look at other objects like stateful deployments, daemon sets and much more in future articles, too.
For now, please share with me why you want to learn Kubernetes and how it went. I would also like to know which applications you are currently working with and which major issues you were facing.