IoT/Edge - Fedora + Ansible + Podman
When it comes to IoT/Edge computing, you have to consider one very special paradigm: "Everything is pull-only". Ansible and Podman can make this work, and we can build a device, that is configured via a Git repository.


When it comes to IoT/Edge computing, you have to consider one very special paradigm: "Everything is pull-only". Ansible and Podman can make this work, and we can build a device, that is configured via a Git repository.
Pull-Only Paradigm
The pull-only paradigm comes from security considerations, but also from the idea that a device should not be managed by accessing it. This means, our IoT/Edge device should not require us to SSH into it or access it in another way from a remote workstation/device.
Very often, this is enforced by disabling remote access entirely and allow it only via "request + opt-in".
Scenario
I want to make an IoT/Edge device. This machine should run Fedora IoT and should get all needed configuration from a Git repository. Therefore, our setup may look like the below:
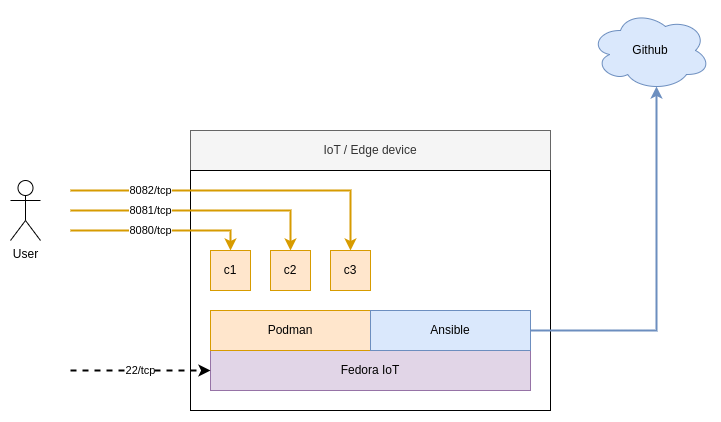
As you can see, Ansible will interact with a Repository on GitHub and Podman will run containers.
Git(Hub)
I have opted for GitHub here, but you can use whatever you like. The repository will hold the playbook and our configuration for the server. In this simple example I am not going into details regarding signing, encryption and secret handling. But we will address these topics soon.
Ansible (Pull)
Ansible comes with a command line utility to check for changes in a Git repository, download the code and apply it automatically. This seems to be perfect for us, and it has the convenient name ansible-pull.
Podman
The containers can be accessed and will provide services. Users can interact with containers, but not with the underlying operating system. In this tutorial, I want to use some very simple container examples, but you can make this more sophisticated. We will also ensure that our containers are restarted on a reboot, which can be done as explained in "Podman - systemd container management".
Setup
Without any further explanation, let's dig into the work.
Install the Operating System
Installing Fedora IoT can be done in many ways. I have chosen to start a virtual machine for testing. You can also use a Raspberry Pi or run an x86 machine, similar to my "Fedora - Home Server" series. In fact, I want to replace the existing home server with Fedora IoT this year.
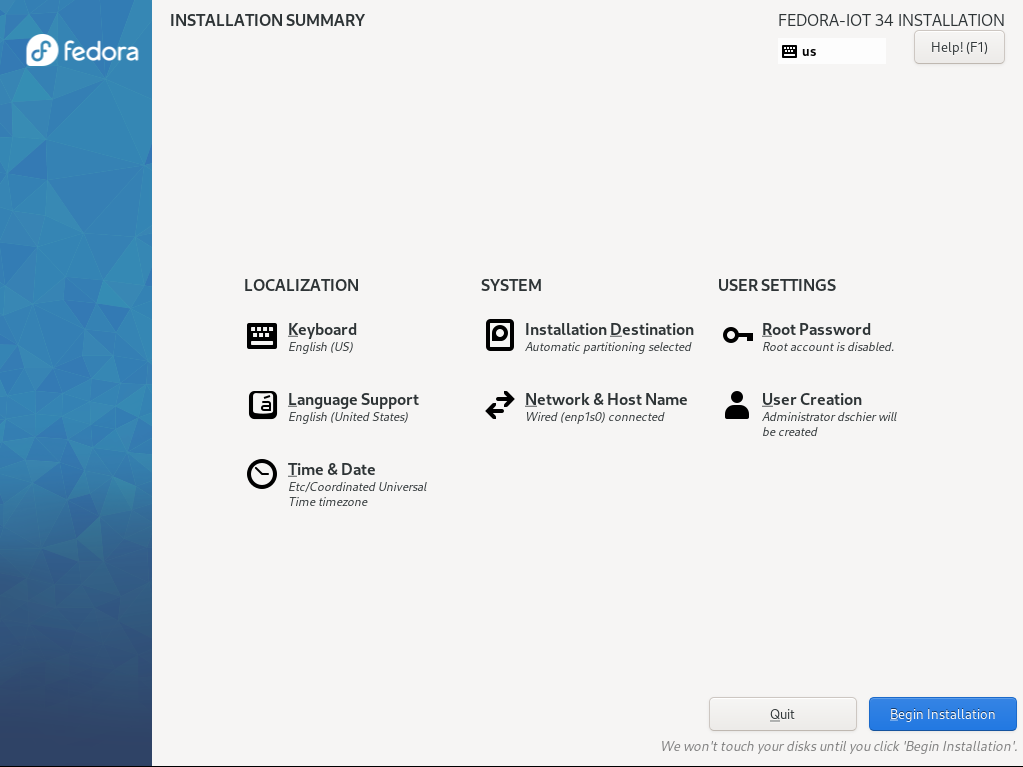
The installation procedure has not changed since my "Spotlight - Fedora IoT" article. You can check this one out, too.
Create the repository
Our configuration and the container deployment code should be stored in Git. Therefore, we need to create a repository. You can find my repository on GitHub.
The next step is, to create your local directory and creating some files. In my case, the directory layout will be:
├── ansible
│   ├── collections
│   │   └── requirements.yml
│   ├── inventory
│   │   └── hosts.yml
│   └── playbooks
│       ├── configure_server.yml
│       ├── install_requirements.yml
│       └── templates
│           ├── ansible-pull.service.j2
│           ├── ansible-pull.timer.j2
│           └── container-web.service.j2
└── README.md
I have decided to create a separate ansible directory, which holds the content of this article. This allows to add more code later on.
Install and configure Ansible (Pull)
This part is the last manual step, we need to take care of. After the successful installation of Fedora IoT, we want to update the machine, install and configure Ansible Pull.
# Perform updates
$ sudo rpm-ostree upgrade

# Install Ansible
$ sudo rpm-ostree install ansible git

# Reboot to apply the changes
$ sudo reboot
That's already it. We will do everything else via Ansible.
Some Ansible code
The next step is, that we want to create some code. For the sake of this article, let's create a playbook, that configures Ansible Pull, starts and enables Podman and creates a container for demonstration purposes.
The first thing we might need is a playbook (as always, =^.^= ).
# ansible/playbooks/configure_server.yml

---
- name: "Configure localhost"
  hosts: "localhost"

  tasks:

    # Ansible Pull
    - name: "Configure Ansible Pull Service"
      ansible.builtin.template:
        src: "ansible-pull.service.j2"
        dest: "/etc/systemd/system/ansible-pull.service"
        owner: "root"
        group: "root"
        mode: 0644
      become: true

    - name: "Configure Ansible Pull Timer"
      ansible.builtin.template:
        src: "ansible-pull.timer.j2"
        dest: "/etc/systemd/system/ansible-pull.timer"
        owner: "root"
        group: "root"
        mode: 0644
      become: true

    - name: "Reload Services"
      ansible.builtin.systemd:
        daemon_reload: true
      become: true

    - name: "Enable Ansible Pull Service"
      ansible.builtin.systemd:
        name: "ansible-pull.service"
        enabled: true
      become: true

    - name: "Start & Enable Ansible Pull Timer"
      ansible.builtin.systemd:
        name: "ansible-pull.timer"
        state: "started"
        enabled: true
      become: true

    # Podman
    - name: "Start & Enable Podman Socket"
      ansible.builtin.service:
        name: "podman.socket"
        state: "started"
        enabled: true
      become: true

    - name: "Start & Enable Podman Auto Update Timer"
      ansible.builtin.service:
        name: "podman-auto-update.timer"
        state: "started"
        enabled: true
      become: true

    # container-web
    - name: "Download Image"
      containers.podman.podman_image:
        name: "docker.io/library/nginx"
        tag: "latest"
        state: "present"
      become: true
      tags:
        - "image"
        - "podman"
        - "web"

    - name: "Manage Service File"
      ansible.builtin.template:
        src: "container-web.service.j2"
        dest: "/etc/systemd/system/container-web.service"
        owner: "root"
        group: "root"
        mode: 0644
      become: true

    - name: "Manage container-web Service"
      ansible.builtin.service:
        name: "container-web.service"
        state: "started"
        enabled: true
      become: true
...
You can find two Podman related tasks here, which are not needed for this example. The auto-update timer is required, if you want to take care of automated image updates, as described in "Podman - Auto Updates". Activating the Podman Socket can be useful for additional services like Cockpit, as described in "Fedora - Home Server (Container)". If you don't intend to use such services, you can remove this task.
You can also find some "ansible.builtin.template" tasks, which require three templates to execute this playbook. We will create them next.
The first two templates are meant to create a service and a timer, which starts the service on a schedule. The service is pretty easy; it just runs a ansible-pull command pointing to our repository.
[Unit]
Description=Run Ansible Pull
After=network-online.target

[Service]
ExecStart=/usr/bin/ansible-pull \
	--url https://github.com/dschier-wtd/fedora-iot.git \
	--inventory inventory/hosts.yml \
	--only-if-changed \
	--checkout main \
	ansible/playbooks/install_requirements.yml \
	ansible/playbooks/configure_server.yml
If you look closely, you might discover that I added a second playbook "install_requirements.yml". We will come to this later. For now, we also want to have a template for our timer unit.
[Unit]
Description=Ansible Pull Timer

[Timer]
Unit=ansible-pull.service
OnCalendar=*:0/30:00
Persistent=true

[Install]
WantedBy=multi-user.target
This timer will ensure that the above service is executed every 30 minutes.
But, there was one more service for the container deployment. Let's create this, too.
# container-web01.service

[Unit]
Description=Podman container-web.service
Documentation=man:podman-generate-systemd(1)
Wants=network-online.target
After=network-online.target
RequiresMountsFor=%t/containers

[Service]
Environment=PODMAN_SYSTEMD_UNIT=%n
Restart=on-failure
TimeoutStopSec=70
ExecStart=/usr/bin/podman run \
	--cidfile=%t/%n.ctr-id \
	--cgroups=no-conmon \
	--rm \
	--sdnotify=conmon \
	--replace \
	--detach \
	--tty \
	--name web \
	--publish 8080:80 \
	docker.io/library/nginx:latest
ExecStop=/usr/bin/podman stop \
	--ignore -t 10 \
	--cidfile=%t/%n.ctr-id
ExecStopPost=/usr/bin/podman rm \
	--force \
	--ignore -t 10 \
	--cidfile=%t/%n.ctr-id
Type=notify
NotifyAccess=all

[Install]
WantedBy=default.target
This is a super simple service, which will start an nginx instance. You can find more sophisticated examples for similar deployments in the "Fedora - Home Server" series.
Do you remember the above "install_requirements.yml" from the "ansible-pull.service"? This is meant to install necessary ansible collections. Ansible on it's own does not contain the "containers.podman" collection, which is needed to create containers for Podman or pull images.
Unfortunately, Ansible does not have a way to pull these automatically. Instead, we can create a playbook that installs the requirements and start the real playbook afterward. For this, we will need the playbook and a requirements file.
---
- name: "Install Requirements"
  hosts: "localhost"
  gather_facts: false

  tasks:

    - name: "Install requirements"
      ansible.builtin.command:
        cmd: "ansible-galaxy collection install -r ../collections/requirements.yml"
      tags:
        - "requirements"
...
Easy enough, right? Now, the "requirements.yml" is one more piece.
---
collections:
  - name: "ansible.posix"
  - name: "containers.podman"
...
If we need other collections, we can add them to the "requirements.yml" and our playbook from above will take care of the installation.
Lastly, we should provide an inventory. This is mostly for convenience and to avoid some warnings during execution. It is already referenced in the "ansible-pull.service".
---
- all:
    hosts:
      localhost:
        ansible_connection: "local"
...
The resulting repository will look like the below:
├── ansible
│   ├── collections
│   │   └── requirements.yml
│   ├── inventory
│   │   └── hosts.yml
│   └── playbooks
│       ├── configure_server.yml
│       ├── install_requirements.yml
│       └── templates
│           ├── ansible-pull.service.j2
│           ├── ansible-pull.timer.j2
│           └── container-web.service.j2
└── README.md
That was a lot of code. You might start with a smaller example, but I wanted to provide a boilerplate that is a bit more complete than the other tutorials you might find for this topic.
The first deployment
Finally, we want to deploy the code. For the initial deployment, we just need to connect to our desired host and run a single command (as root).
# Run ansible-pull manually (only once needed)
$ /usr/bin/ansible-pull \
	--url https://github.com/dschier-wtd/fedora-iot.git \
	--inventory inventory/hosts.yml \
	--only-if-changed \
	--checkout main \
	ansible/playbooks/install_requirements.yml \
	ansible/playbooks/configure_server.yml
Isn't it funny? This is the exact same command, we already have in the ansible-pull.service file. After running it, you can find all the necessary files and a started container. Just check out the results:
# check for ansible-pull services
$ systemctl status ansible-pull.service
$ systemctl status ansible-pull.timer

# Check for the started containers
$ systemctl status container-web.service
$ podman ps
From now on, the ansible-pull service will look every 30 minutes if something changed and apply the changes. You can even embrace this by making your Podman containers auto updating.
Docs & Links
In some past articles, I provided articles that might be helpful for your first steps and some better understanding what can be done with Ansible and Podman.
 dschier-wtd
 Daniel Schier
 Daniel Schier
 Daniel Schier
 Daniel Schier
Conclusion
This weekend, I will also have a presentation and a lecture on the Chemnitz Linux Days. As you might have guessed, it will be about Ansible and IoT. I will ensure to upload the content to my presentation repository.
Please don't hesitate to send me your feedback, suggestions, or ideas. I am thrilled to hear if this article was helpful for you.