Ansible - Linux Workstation Management
Managing servers with Ansible is a common task. But you can also automate the setup of your own workstation. Setting a wallpaper, installing software, managing repositories and more can be done with Ansible.


Managing servers with Ansible is a common task. But you can also automate the setup of your own workstation. Setting a wallpaper, installing software, managing repositories and more can be done with Ansible.
Managing Workstation(s)
Managing the own workstation seems a bit weird, I know. But there are very good reasons to do so. Please let me explain.
Firstly, this is an awesome exercise to learn Ansible. So, if you are new to Ansible, you will learn a lot.
Managing your Workstation also allows you to document your needed tools and where to get them. You will also be able to share your setup with others. So, no more copy-paste for installing a special package or graphics drivers.
With some structuring, you will also get the option to destroy and re-deploy parts of your environment. Getting some Python virtualenv ready or running a bunch of containers for development is a piece of cake, once you got the idea.
This guide is focussing on Fedora Linux, but can be easily adapted to support other distributions. In case you want to manage Windows or macOS, I will come up with something in the future.
Prerequisites
Before starting, with the development, you need to ensure, that you have Ansible installed on your machine. You can check out the official documentation or the article "Ansible - Getting Started".
If this is your first playbook, I strongly recommend reading the article "Ansible - Playbooks", too.
Packages
Installing packages that you need may be the first thing one thinks of. This can be done with the Package module. For example, I would love to have virtualization on my machine and also will need Vagrant for my development. Let's create the playbook and install some packages.
It's a good idea to put your playbook in a project directory.
# Create the directory and playbook
$ mkdir workstation
$ cd workstation
$ touch workstation.yml
Edit the workstation.yml as described below.
---
- name: "Manage workstation"
  hosts: "localhost"
  connection: "local"

  tasks:

    - name: "Install Virtualization"
      ansible.builtin.package:
        name:
          - "libvirt-client"
          - "qemu-kvm"
          - "libvirt-daemon-driver-network"
          - "libvirt-daemon-config-network"
        state: "present"
      become: true

    - name: "Install Vagrant"
      ansible-builtin.package:
        name: "vagrant"
        state: "present"
become: truePlease have a look at the "hosts" statement and "connection". This way, Ansible will use the localhost for deployment and connect locally. So, no need to enable SSH.
Let's run the playbook. The "-K" option is needed to provide your "sudo" password.
# Run ansible
$ ansible-playbook -K workstation.yml
After running the playbook, you will have Vagrant and KVM installed on your machine, but the services aren't started, yet.
Services
In most cases, you also require a couple of services running on your machine. In my case, I am ensuring that libvirtd (for the above virtualization), thermald (for intel thermal management) and fstrimd (for SSD maintenance) are running and enabled. I am using the service module for these tasks.
You can extend the above playbook very easily with some tasks.
...
    - name: "Start & Enable libvirtd Service"
      ansible-builtin.service:
        name: "libvirtd.service"
        state: "started"
        enabled: true
      become: true

    - name: "Start & Enable thermald Service"
      ansible-builtin.service:
        name: "thermald.service"
        state: "started"
        enabled: true
      become: true

    - name: "Start & Enable fstrim Timer"
      ansible-builtin.service:
        name: "fstrim.timer"
        state: "started"
        enabled: true
      become: true
...Running the playbook will enable libvirt and the other 2 services.
# Run ansible
$ ansible-playbook -K workstation.yml
Since the virtualization is completely setup now, you can test the "virsh" and "vagrant" commands.
# Check libvirt/KVM
$ virsh --version
7.0.0

# Check Vagrant
$ vagrant --version
Vagrant 2.2.16
Flatpak
Having some basic tools for development is nice, but what about graphical tools like the VSCodium or GIMP? You can add these via rpm packages as described above, or use Flatpaks from Flathub.

I am using 99% Flatpaks - therefore let's see how this works. First, we need to add the Flathub repository task (which uses the Flatpak remote module) to the workstation.yml.
...
    - name: "Manage flathub Repository"
      community.general.flatpak_remote:
        name: "flathub"
        state: "present"
        flatpakrepo_url: "https://dl.flathub.org/repo/flathub.flatpakrepo"
        method: "system"
      become: true
...Additionally, we can add packages, that we want to install as tasks as described in the below code snippet. We are using the Flatpak module for these tasks.
...
    - name: "Install GIMP Flatpak"
      community.general.flatpak:
        name: "org.gimp.GIMP"
        state: "present"
      become: true

    - name: "Install VSCodium Flatpak"
      community.general.flatpak:
        name: "com.vscodium.codium"
        state: "present"
      become: true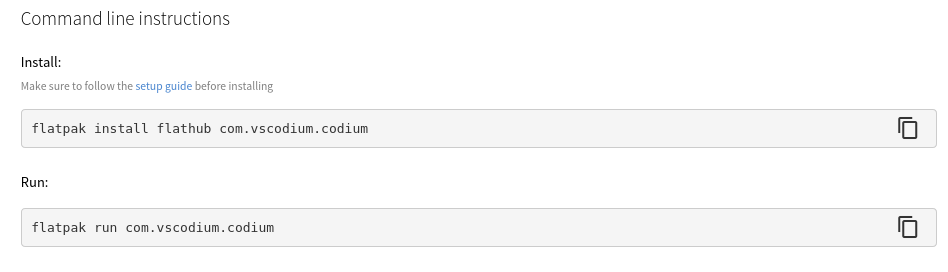
...The flatpak package names above are the package names provided in the Flathub URL or from the end of each Flathub page (Command line instructions).
Python, NodeJS, Ruby
You can also manage your Python, NodeJS packages or Rub Gems with Ansible. This can be very useful to set up your personal development environment and maintain it, without having to fiddle with requirements files.
The below example shows how you can create a simple task for an Ansible Python environment.
You need to edit the workstation.yml again and add this content.
...
    - name: "Create Ansible VENV"
      ansible.buitlin.pip:
        name: "ansible"
        virtualenv: "/home/USER/.venv-ansible"
...Similar to the last sections, you can run the below command to apply your playbook.
# Run ansible
$ ansible-playbook -K workstation.yml
Please check out the npm, gem or pip module to get more details about these.
GNOME settings
Finally, I want to change some GNOME settings. In my example, I am enabling NightShift and will also enable the maximize/minimize buttons for windows.
We will use the dconf module for the same and edit the workstation playbook as described below.
...
    - name: "Enable the NightLight"
      community.general.dconf:
        key: "/org/gnome/settings-daemon/plugins/color/night-light-enabled"
        value: "true"
        state: "present"

    - name: "Window Buttons"
      community.general.dconf:
        key: "/org/gnome/desktop/wm/preferences/button-layout"
        value: "'appmenu:minimize,maximize,close'"
        state: "present"
...Docs & Links
Of course, you can find the description for each module in the official Ansible documentation. Furthermore, you can find a similar, but older article on Fedora Magazine.
 Link Dupont
In case you want to tweak your gnome desktop heavily via dconf, you should have a look here:
 Written By Ekaterina GerasimovaJim Campbell
Lastly, you can find the example playbook from this article here and my new version (starting to be useable with Fedora 35) in my personal repository.
Update
I updated some links to point to the proper repository over at GitHub.
Conclusion
As you can see, you can manage a lot of stuff with Ansible on your personal workstation. If you maintain your setup properly, you can recreate it in minutes and even share it with your team or colleagues.