Ansible - Console
With Python, you can just open a shell and quickly try out some code in a so-called REPL console. Guess what, you can do the same with Ansible. Browse your inventory, and even remote file systems in an interactive shell with ansible-console.

With Python, you can just open a shell and quickly try out some code in a so-called REPL console. Guess what, you can do the same with Ansible. Browse your inventory, and even remote file systems in an interactive shell with ansible-console.
Let's create a minimal project and see how Ansible can be used interactively!
Ansible
Ansible is the Open Source automation software for small use cases or entire cloud ecosystems. With just a bit of YAML, you can start to automate your package installations, network configuration or Kubernetes on AWS.
In the past, I wrote a couple of articles about Ansible and also took a look at the ecosystem occasionally. In case you never heard of Ansible, you should start with one of my "Getting Started" articles.
REPL
The term REPL (Read-Eval-Print-Loop), also known as interactive top level or language shell, describes a simple, interactive programming environment. Most often, you will find these REPL environments like Python, but also in JavaScript.
The intention is, that you can easily try out things, run commands for debugging or execute scripts piecewise. In case you still don't have an idea. The GNU Bash, you will find on many Linux environments, is in fact a REPL. If you open a terminal, you will end up in the REPL, but you can also execute scripts, written with the same commands.
Ansible Console
Now, Ansible came up with the idea to have their own REPL. This means, that we should be able to interact with Ansible, our code and execute things. Let's try this out with a simple environment.
Install Ansible
For my simple setup, I will create a Python virtualenv. This makes it super convenient to install, update, delete Ansible how I like it.
$ python -m venv .venv
$ source .venv/bin/activate
$ pip install ansible
In case you need a proper rundown of the Ansible installation, or in case you never worked with Ansible before, I strongly suggest reading "Ansible - Getting Started" first.
Project
For our test project, I have chosen to create some small virtual machines and use my workstation as the Ansible controller.
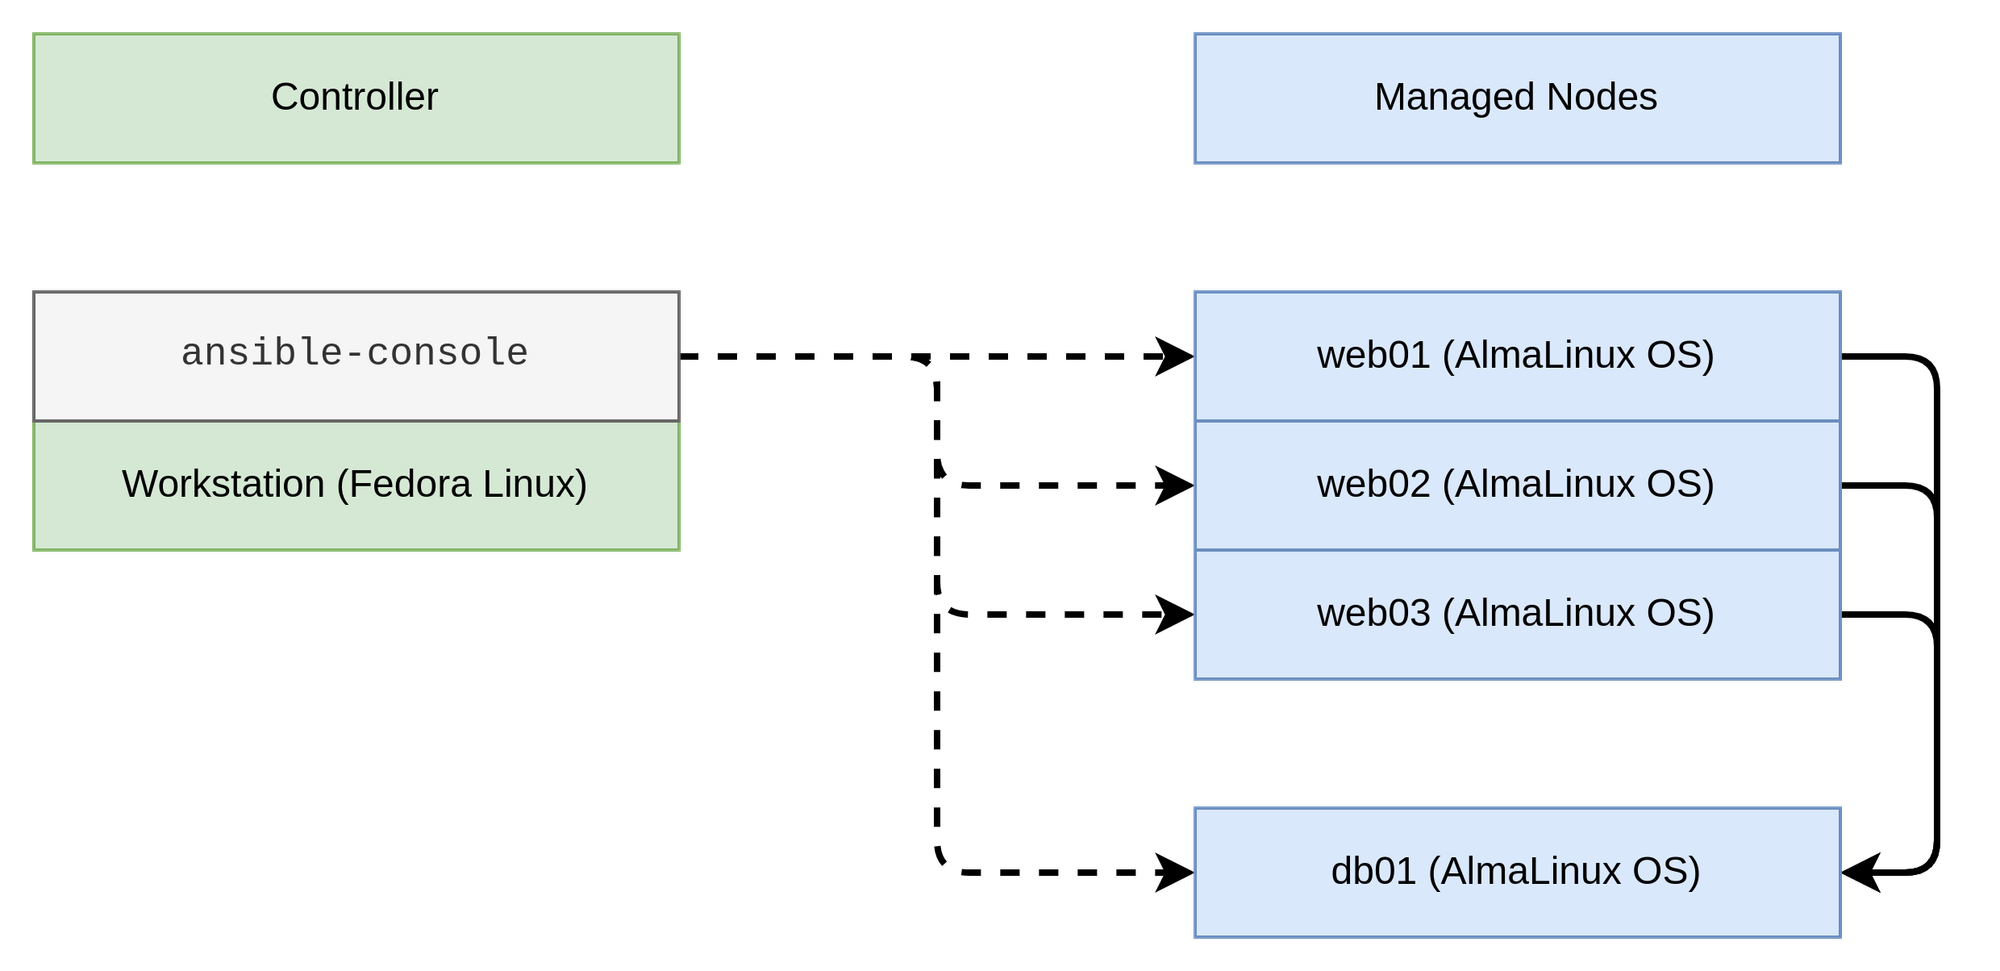
Therefore, we will create some files to set up this project. We will need an inventory, two playbooks, plus one for the entire site. The directory layout can be something like this:
$ tree
.
├── ansible
│   ├── ansible.cfg
│   ├── db.yml
│   ├── inventories
│   │   └── demo
│   │       └── hosts.yml
│   ├── site.yml
│   └── web.yml
Let's fill these files with some content. Starting with the inventory seems natural. In my case, I have added the IP addresses, since I don't have proper DNS resolution in this environment.
# ansible/inventories/demo/hosts.yml
---
all:
  children:
    web:
      hosts:
        web01:
          ansible_ssh_host: "192.168.122.144"
        web02:
          ansible_ssh_host: "192.168.122.243"
        web03:
          ansible_ssh_host: "192.168.122.241"
    db:
      hosts:
        db01:
          ansible_ssh_host: "192.168.122.2"
...
ansible/inventories/demo/hosts.yml
Next, we want to install MariaDB on the db host and Apache httpd on the web servers. Therefore, let's create two very simple (functional, but by no means complete) playbooks.
---
- name: "Configure Web hosts"
  hosts: "web"

  tasks:
    - name: "Install httpd"
      ansible.builtin.package:
        name: "httpd"
        state: "present"
      become: true

    - name: "Start & Enable httpd"
      ansible.builtin.service:
        name: "httpd"
        state: "started"
        enabled: true
      become: true
...
ansible/web.yml
---
- name: "Configure DB hosts"
  hosts: "db"

  tasks:
    - name: "Install MariaDB"
      ansible.builtin.package:
        name:
        - "mariadb-server"
        state: "present"
      become: true

    - name: "Start & Enable MariaDB"
      ansible.builtin.service:
        name: "mariadb.service"
        state: "started"
        enabled: true
      become: true
...
ansible/db.yml
---
- name: "Configure site"
  hosts: "all"

  tasks:
    - name: "Install firewalld"
      ansible.builtin.package:
        name: "firewalld"
        state: "present"
      become: true

    - name: "Start & Enable firewalld"
      ansible.builtin.service:
        name: "firewalld.service"
        state: "started"
        enabled: true
      become: true

- name: "Import db Playbook"
  ansible.builtin.import_playbook: "db.yml"

- name: "Import web Playbook"
  ansible.builtin.import_playbook: "web.yml"
...
ansible/site.yml
And, that's already it. A quick run of the playbooks will ensure that everything works as desired.
ansible-playbook -k -K -i inventories/demo/hosts.yml site.yml
If everything is fine, you will see a couple of changes.
Starting the console
First, you might want to start the Ansible REPL console. This works pretty much the same way as most Ansible commands.
$ ansible-console -k -K -i inventories/demo/hosts.yml
Welcome to the ansible console. Type help or ? to list commands.

dschier@all (4)[f:5]$
No errors? Awesome. You can run help or ? to get a list of possible actions.
dschier@all (4)[f:5]$ help cd
Change active host/group.
Usage: cd <group>|<host>|<host pattern>

dschier@all (4)[f:5]$ help list
List the hosts in the current group or a list of groups if you add 'groups'.
Browsing the inventory
Now, we want to navigate the inventory a bit. The last section already gave a hint, that there are sub-commands, namely list and cd, which might be useful for the same.
First, let's get an idea of the inventory:
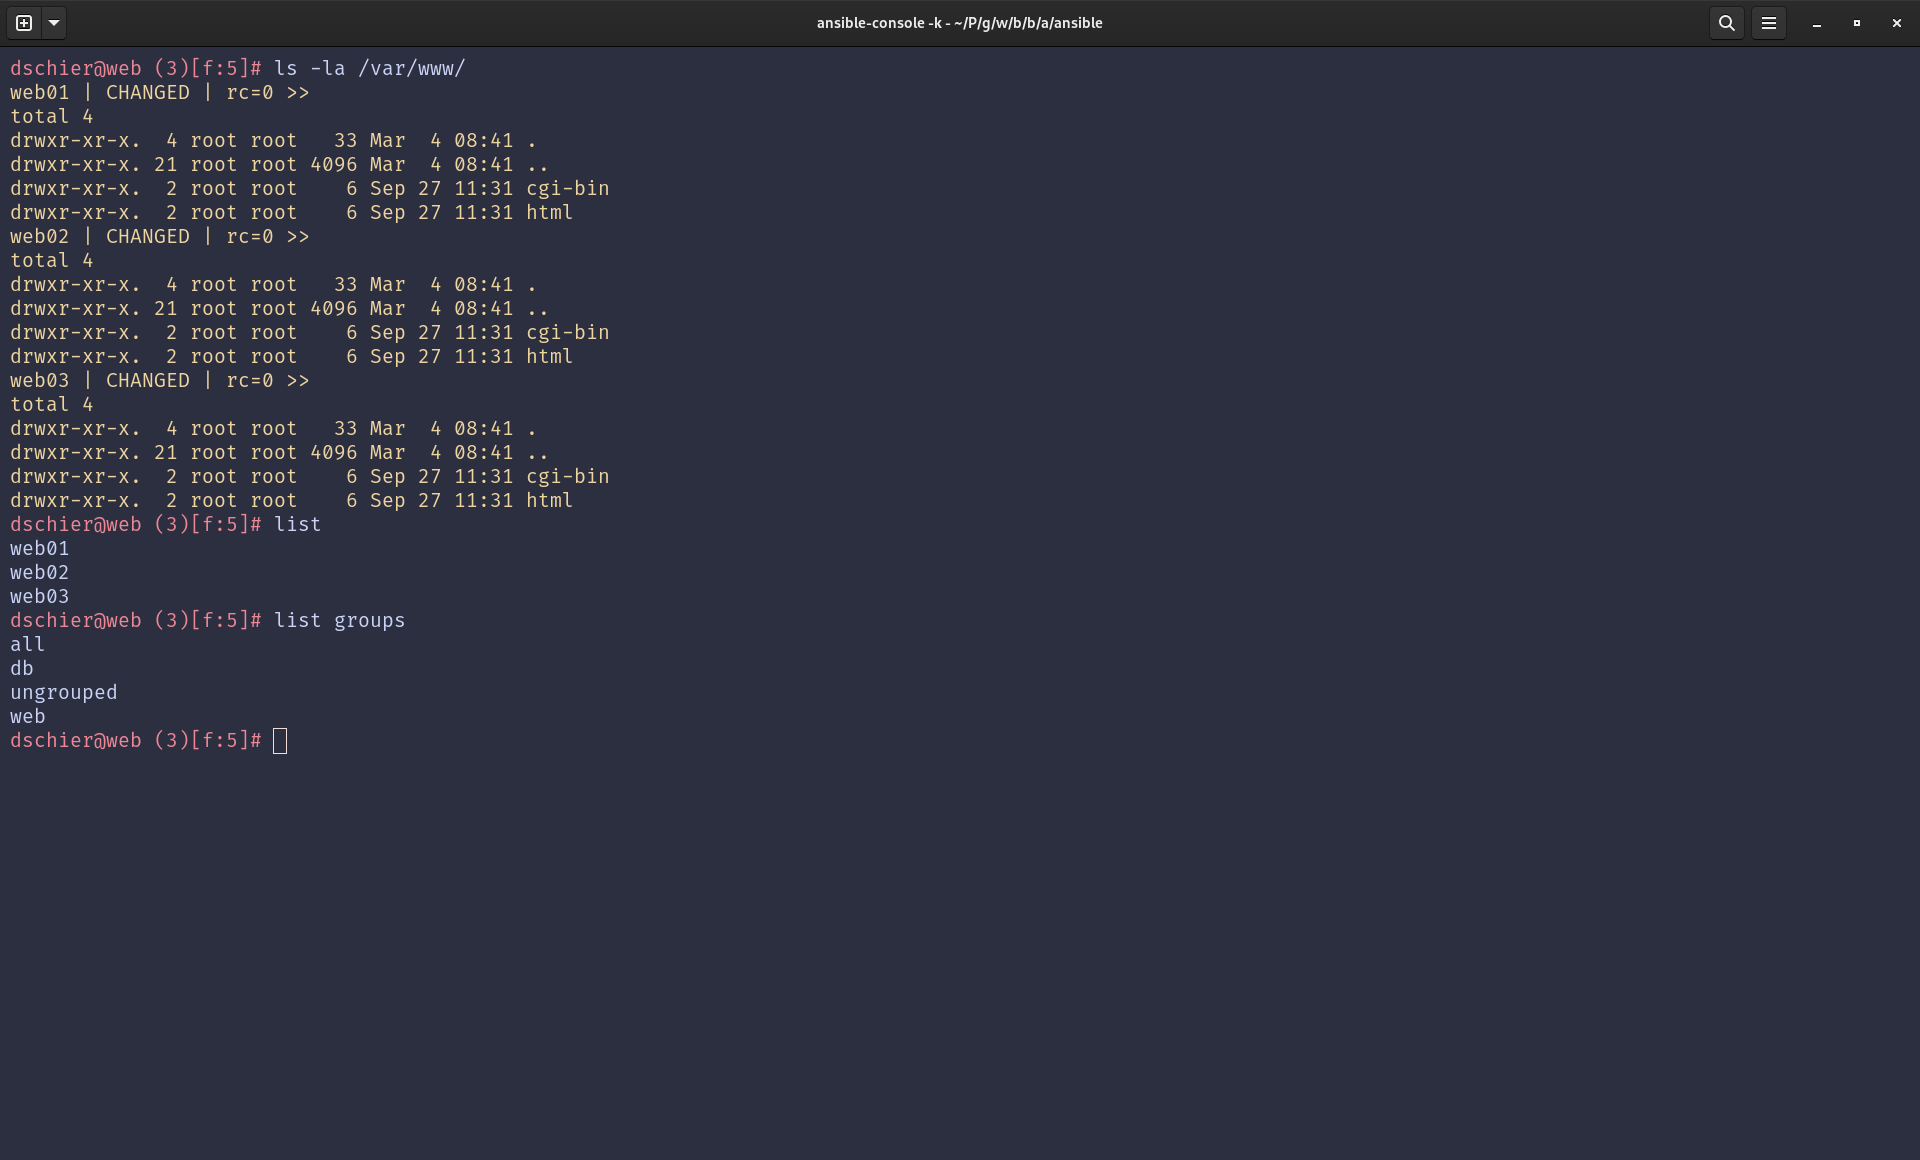
dschier@all (4)[f:5]$ list
web01
web02
web03
db01

dschier@all (4)[f:5]$ list groups
all
db
ungrouped
web
Maybe, we want to change into the web group.
dschier@all (4)[f:5]$ cd web

dschier@web (3)[f:5]$ list
web01
web02
web03

dschier@web (3)[f:5]$ cd all

dschier@all (4)[f:5]$ cd db

dschier@db (1)[f:5]$ list
db01
As you can see, the prompt changes according to the currently active group and the count of hosts in this group.
Executing ad-hoc Ansible
Now that we can move around, let's execute some ad-hoc commands. In case you haven't used ad-hoc commands, you might find "Ansible - ad-hoc commands" useful.
First, I want to restart the httpd web server on my web hosts. To do so, I need to become root beforehand.
# The prompt will change and become red
dschier@web (3)[f:5]$ become true
dschier@web (3)[f:5]#

# Now let's restart http
dschier@web (3)[f:5]# ansible.builtin.service name=httpd.service state=restarted
You will see lots of output, providing detailed information about the change. Perhaps, you also want to install nmap for debugging purposes.
dschier@web (3)[f:5]# ansible.builtin.package name=nmap state=present
web01 | CHANGED => {
    "changed": true,
    "msg": "",
    "rc": 0,
    "results": [
        "Installed: nmap-ncat-3:7.92-1.el9.x86_64",
        "Installed: nmap-3:7.92-1.el9.x86_64",
        "Removed: nmap-ncat-3:7.91-12.el9.x86_64"
    ]
}
web03 | CHANGED => {
    "changed": true,
    "msg": "",
    "rc": 0,
    "results": [
        "Installed: nmap-ncat-3:7.92-1.el9.x86_64",
        "Installed: nmap-3:7.92-1.el9.x86_64",
        "Removed: nmap-ncat-3:7.91-12.el9.x86_64"
    ]
}
web02 | CHANGED => {
    "changed": true,
    "msg": "",
    "rc": 0,
    "results": [
        "Installed: nmap-ncat-3:7.92-1.el9.x86_64",
        "Installed: nmap-3:7.92-1.el9.x86_64",
        "Removed: nmap-ncat-3:7.91-12.el9.x86_64"
    ]
}
Also, I want to ensure that a directory is existing, which I need for debugging in the next section.
dschier@web (3)[f:5]# ansible.builtin.file state=directory path=/var/lib/debug/

web03 | CHANGED => {
    "changed": true,
    "gid": 0,
    "group": "root",
    "mode": "0755",
    "owner": "root",
    "path": "/var/lib/debug/",
    "secontext": "unconfined_u:object_r:var_lib_t:s0",
    "size": 6,
    "state": "directory",
    "uid": 0
}
web01 | CHANGED => {
    "changed": true,
    "gid": 0,
    "group": "root",
    "mode": "0755",
    "owner": "root",
    "path": "/var/lib/debug/",
    "secontext": "unconfined_u:object_r:var_lib_t:s0",
    "size": 6,
    "state": "directory",
    "uid": 0
}
web02 | CHANGED => {
    "changed": true,
    "gid": 0,
    "group": "root",
    "mode": "0755",
    "owner": "root",
    "path": "/var/lib/debug/",
    "secontext": "unconfined_u:object_r:var_lib_t:s0",
    "size": 6,
    "state": "directory",
    "uid": 0
}
Pretty easy, right?
Interacting with the host OS
But, there is more. You can interact with the host operating system directly. Let's test this out, too. Basically, running commands as if you are on the machine(s) itself, is possible.
dschier@web (3)[f:5]# ls -la /var/lib/debug

web01 | CHANGED | rc=0 >>
total 4
drwxr-xr-x.  2 root root    6 Mar  4 09:37 .
drwxr-xr-x. 38 root root 4096 Mar  4 09:37 ..
web02 | CHANGED | rc=0 >>
total 4
drwxr-xr-x.  2 root root    6 Mar  4 09:37 .
drwxr-xr-x. 38 root root 4096 Mar  4 09:37 ..
web03 | CHANGED | rc=0 >>
total 4
drwxr-xr-x.  2 root root    6 Mar  4 09:37 .
drwxr-xr-x. 38 root root 4096 Mar  4 09:37 ..
Uh, this means we can run our nmap command and see the output.
dschier@web (3)[f:5]# /usr/bin/nmap -PN -sT -p 3306 {{ hostvars.db01.ansible_ssh_host }}

web03 | CHANGED | rc=0 >>
Starting Nmap 7.92 ( https://nmap.org ) at 2024-03-04 09:40 UTC
Nmap scan report for 192.168.122.2
Host is up (0.00084s latency).

PORT     STATE    SERVICE
3306/tcp filtered mysql

Nmap done: 1 IP address (1 host up) scanned in 0.26 seconds
web02 | CHANGED | rc=0 >>
Starting Nmap 7.92 ( https://nmap.org ) at 2024-03-04 09:40 UTC
Nmap scan report for 192.168.122.2
Host is up (0.00068s latency).

PORT     STATE    SERVICE
3306/tcp filtered mysql

Nmap done: 1 IP address (1 host up) scanned in 0.32 seconds
web01 | CHANGED | rc=0 >>
Starting Nmap 7.92 ( https://nmap.org ) at 2024-03-04 09:40 UTC
Nmap scan report for 192.168.122.2
Host is up (0.00087s latency).

PORT     STATE    SERVICE
3306/tcp filtered mysql

Nmap done: 1 IP address (1 host up) scanned in 0.33 seconds
See, the firewall is closed. But take a look at the command again. We can use Ansible variables in our commands.
And yay, let's stop it here. I assume this is a lot to inhale and experiment with.
Docs & Links
Before sending you to the conclusion, let me also provide some helpful links.


 Luca Berton
 Egidio Docile
Oh, and I just started to push example code to a dedicated repository for the blog. Maybe I find some motivation to push older examples, too. At least, I want to add new code there.


Conclusion
For me, ansible-console made it even easier to never log in to a machine directly. My inventory files became the "truth" for interactions. Changing things ad-hoc on many machines became easier than ever. No more ssh && vi && restart shenanigans.
What about you, have you already worked with Ansible Console? Do you consider trying it out? Let me know!